

Aerospike had the pleasure of hosting Theodore in a short internship for a school project exploring how companies work. He spent some time tinkering with the Aerospike database and documented his journey, which he shared with us. We in turn would like to share the work of this promising student, with his permission of course, with you. As this was Theodore's first time working with this technology stack, we've added a few [Editors notes] to help with some of the commands. So, without further ado, here's Theodore's report:
How to create an Aerospike Database
This document was written during my 1 week internship at Aerospike and has all the steps I went through during that to create a functional database and a data visualization program in python. This project took 3 days in total. All the official documentation for Aerolab can be found here and the resources for API programming here.
Get WSL
Needs Windows 10 (build 19041 or higher)or Windows 11
Open PowerShell as administrator (right click and “run as administrator”)
Run:
wsl --install5. Restart your PC
6. Wait for Ubuntu to install
7. Enter a new username
8. Enter a new password
Install Docker
1. To update to the latest version:
sudo apt update && sudo apt upgrade2. Install the necessary packages to allow apt to use repositories over HTTPS:
sudo apt install apt-transport-https ca-certificates
curl software-properties-common
3. Add the official Docker GPG key using the following command:
curl -fsSL https://download.docker.com/linux/ubuntu/gpg | sudo gpg --dearmor -o /usr/share/keyrings/docker-archive-keyring.gpg 4. Add the Docker repository to the apt sources list:
echo "deb [arch=amd64 signed-by=/usr/share/keyrings/docker-archive-keyring.gpg] https://download.docker.com/linux/ubuntu $(lsb_release -cs) stable" | sudo tee /etc/apt/sources.list.d/docker.list > /dev/null 5. Update the package index again to include the Docker repository:
sudo apt update6. Install Docker by running the following command:
sudo apt install docker-ce docker-ce-cli containerd.io7. Verify docker is running:
docker --versionInstall Aerolab
[Editors note: use cd ~ instead of steps 1 and 2]
In Ubuntu run:
cd .. #until you are at the furthest out directoryAccess the bin:
cd usr/local/bin/Install the Aerolab package:
For AMD:sudo wget https://github.com/aerospike/aerolab/releases/download/5.4.6/aerolab-linux-amd64-5.4.6.debFor ARM:sudo wget https://github.com/aerospike/aerolab/releases/download/5.4.6/aerolab-linux-arm64-5.4.6.debThen, depending on the file you downloaded run:
[Editors note: this step is not technically required]sudo chmod +x [FILE NAME]Unpack the file:
sudo dpkg -i [FILE NAME]The Aerolab command is now available so run:
aerolabFollow the given instructions.
Install VSCode
Run on Ubuntu:
aerolab client create vscode -n vscode -e 8080:8080Open in your browser: http://localhost:8080
VSCode should now be accessible.
Creating Clusters and adding AMS
Clusters contain nodes which store your data. If you have an enterprise version by default you will be limited to 1 node. For my internship I was able to get a feature file which allowed for 5 nodes for 2 weeks.
Create a 5 node cluster by running:
aerolab cluster create -n myCluster -c 5Add the prometheus exporter by running:
aerolab cluster add exporter -n myClusterCreate the AMS client:
aerolab client create ams -n ams -s myCluster -e 3000:3000Open in your browser: http://localhost:3000
The User and Password for Grafana is:
admin,adminThe AMS now works!
Get AS Bench Working
ASBench allows you to test your nodes and clusters by putting them under strain.
To get started, create 5 tools clients:
aerolab client create tools -n myClient -c 5Add Promtail to clients to push asbenchmark logs to AMS stack:
aerolab client configure tools -l all -n myClient --ams amsTo test ASBench on your cluster just run:
[Editors note: this command should beaerolab attach client -n myClient -l all --parallel --asbench]aerolab attach shell -n myCluster -l all asbenchThere are additional parameters you can tinker with.
Code Example
I wanted to be able to actually use this database for something so I decided to use it to visualize statistics. It's important to note this isn't necessarily the best way to use this database as it's much better suited for 24/7 use where you need to be able to quickly view data.
To do this, first download the Air Traffic Passenger Statistics from Data.gov.
Then insert the file into VSCode by dragging it into the python folder.
Add the following two scripts to the folder:
uploadRecords.py
import aerospikeconfig = {
'hosts': [
( '172.17.0.2', 3000 ),
( '172.17.0.3', 3000 ),
( '172.17.0.4', 3000 ),
( '172.17.0.5', 3000 ),
( '172.17.0.6', 3000 )
],
'policies': {
'timeout': 10000 # milliseconds
}
}
client = aerospike.client(config) client.connect() write_policy = {'key': aerospike.POLICY_KEY_SEND} f = open("/opt/code/python/Air_Traffic_Passenger_Statistics.csv", "r") i=0
for line in f:
line = line[0:len(line)-1] #remove last "\n" from the end
line = line.split(",") #turn line into list i+=1
if i==1:
headers = line #get headers from first line
else:
key = ('test', 'ATPStatistics', 5000+i) #key for each record, increases by 1 for each
reportMap = {} #actual data
j=0
for header in headers:
reportMap[header]=line[j]
j+=1
bins = {
'occurred': 20220531,
'reported': 20220601,
'posted': 20220601,
'report': reportMap,
}
# Write the record to Aerospike
client.put(key, bins, policy=write_policy) client.close()readRecords.py import aerospike
import plotly.graph_objects as goconfig = {
'hosts': [
('172.17.0.2', 3000),
('172.17.0.3', 3000),
('172.17.0.4', 3000),
('172.17.0.5', 3000),
('172.17.0.6', 3000)
],
'policies': {
'timeout': 10000 # milliseconds
}
}client = aerospike.client(config) client.connect() namespace = 'test' # Replace with your namespace
set_name = 'ATPStatistics' # Replace with your set name airline_passengers = {} policy = {'socket_timeout': 300} scan = client.scan(namespace, set_name) # Create a scan operation # Iterate over all records using scan.foreach()
def process_record(record):
key = record[0]
bins = record[2]
airline = str(bins['report']['Published Airline'])
try:
passengers = int(bins['report']['Passenger Count'])
except:
return
if airline in airline_passengers:
airline_passengers[airline] += passengers
else:
airline_passengers[airline] = passengers scan.foreach(process_record, policy=policy) # Perform the scan operation and process each record
client.close() airlines = list(airline_passengers.keys())
passengers = list(airline_passengers.values()) fig = go.Figure(data=[go.Bar(x=airlines, y=passengers)])
fig.update_layout(
title='Passengers per Airline',
xaxis_title='Airline',
yaxis_title='Passenger Count'
) fig.show()4. In the VSCode terminal install plotly by running:
pip install plotly 5. Replace the IPs in config with your nodes’ IPs, which you can find by running:
aerolab cluster list6. Run uploadRecords.py and then readRecords.py, the output should look like this:
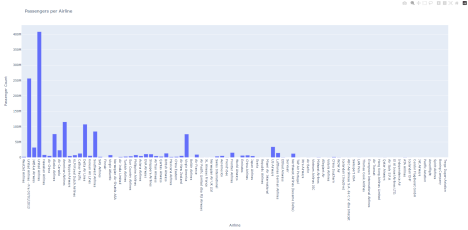
Image of the output
Everything now works! You can interface with the client using your API of choice from here The simplest way to interface is using atomic transactions. You can also clear your cluster by stopping it:
aerolab cluster stop -n myClusterand then start it again:
aerolab cluster start -n myClusterYou can get all the IPs of your nodes for the config by running:
aerolab cluster listand the clients by running:
aerolab client listYou will need to restart the client and clusters when you shut down your computer and you can reconfigure the ams to connect to the nodes by running:
aerolab client configure ams -n ams -s myCluster[Editors note: Amazing job Theodore!]
Keep reading

May 28, 2026
Determining the best machine learning and AI databases

May 18, 2026
The three price tags: How Redis unpredictability costs you infrastructure, engineering time, and UX

May 12, 2026
Monitoring Aerospike Enterprise in Datadog: What you get and how it works

Apr 28, 2026
Aerospike Voyager: From first connection to production code