When using the Aerospike Kubernetes Operator, the complexity of configuring a high performance distributed database is abstracted away, making the task of instantiating an Aerospike database incredibly easy. However, even though Kubernetes leads us towards expecting equivalent results regardless of platform, we need to be mindful of the peculiarities of individual frameworks, particularly if we are repeatedly iterating processes.
This article focuses on AWS EKS provisioned storage which is dynamically created when using the Aerospike Kubernetes Operator. Ensuring that storage has been fully deleted and other redundant resources removed is a necessary housekeeping step if you are to avoid unwelcome AWS charges.
In this article we review
How to create a simple AWS EKS cluster
Install the Aerospike Kubernetes Operator
How AWS Provisioned EBS Storage volumes are created
The results of repeated Aerospike database cluster creation - particularly the resulting storage utilization
Database cluster termination, with a focus on how the storage assets are managed
What to watch out for
. . . .
Create an EKS Cluster
In this section we create an EKS cluster, on which we will install Aerospike.
Setup
Create a file called my-cluster.yaml with the following contents. This specifies the configuration for the Kubernetes cluster itself. The ssh configuration is optional.
apiVersion: eksctl.io/v1alpha5
kind: ClusterConfig
metadata:
name: my1-eks-cluster
region: us-east-1
nodeGroups:
- name: ng-1
labels: { role: database }
instanceType: t3.medium
desiredCapacity: 3
volumeSize: 13
ssh:
allow: true # will use ~/.ssh/id_rsa.pub as the default ssh keyWe use the AWS eksctl tool to create our Kubernetes cluster. For more information on using eksctl see the official documentation.

Using eksctl ...
eksctl create cluster -f my-cluster.yamlThe result on completion will be a 3 node Kubernetes cluster. Confirm successful creation as follows :
kubectl get nodes -L role
NAME                             STATUS   ROLES    AGE   VERSION                ROLE
ip-192-168-13-47.ec2.internal    Ready    <none>   10m   v1.22.12-eks-ba74326   database
ip-192-168-23-112.ec2.internal   Ready    <none>   10m   v1.22.12-eks-ba74326   database
ip-192-168-40-59.ec2.internal    Ready    <none>   10m   v1.22.12-eks-ba74326   database
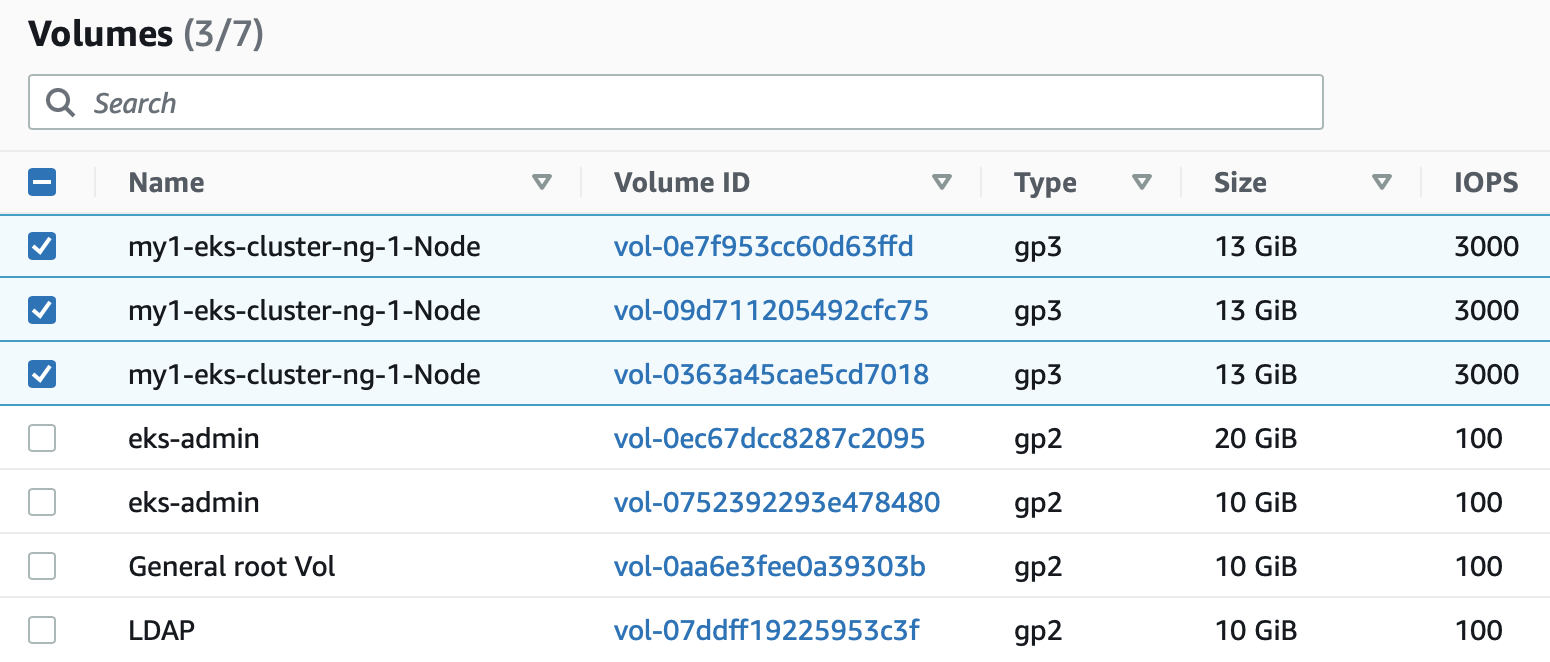
We can check what volumes are created. In my-cluster.yaml volume size is 13Gb, allowing these to be easily located when using the AWS EC2 console.

Install Aerospike
Aerospike Kubernetes Operator
In this section we install the AKO ( Aerospike Kubernetes Operator ) and set up our database cluster. Please refer to the following documentation for details as to how to do this.

AKO installation can be confirmed by checking the pods in the operators namespace.
kubectl get pods -n operators
NAME                                                     READY   STATUS    RESTARTS   AGE
aerospike-operator-controller-manager-7946df5dd9-lmqvt   2/2     Running   0          2m44s
aerospike-operator-controller-manager-7946df5dd9-tg4sh   2/2     Running   0          2m44s
Create the Aerospike Database Cluster
In this section we create an Aerospike cluster. For full detail please refer to the documentation below.

The basic steps are as follows.
Get the code
Clone the Aerospike Kubernetes Git repo and be sure to copy your feature/licence key file, if you have one, to the following directory - config/samples/secrets.
git clone https://github.com/aerospike/aerospike-kubernetes-operator.git
cd aerospike-kubernetes-operator/
Initialise Storage
kubectl apply -f config/samples/storage/eks_ssd_storage_class.yaml
kubectl apply -f config/samples/storage/local_storage_class.yaml
Add Secrets
Secrets, for those not familiar with the terminology, allow data to be introduced into the Kubernetes environment, while ensuring that it canot be read. Examples might include private PKI keys or passwords.
kubectl  -n aerospike create secret generic aerospike-secret --from-file=config/samples/secrets
kubectl  -n aerospike create secret generic auth-secret --from-literal=password='admin123'
Create Aerospike Cluster
We set up Aerospike using the ssd storage recipe.
kubectl create -f config/samples/ssd_storage_cluster_cr.yaml kubectl get pods -n aerospike
NAME READY STATUS RESTARTS AGE
aerocluster-0-0 1/1 Running 0 36s
aerocluster-0-1 1/1 Running 0 36s. . . .
Persistent Volumes and Claims (PV,PVC)
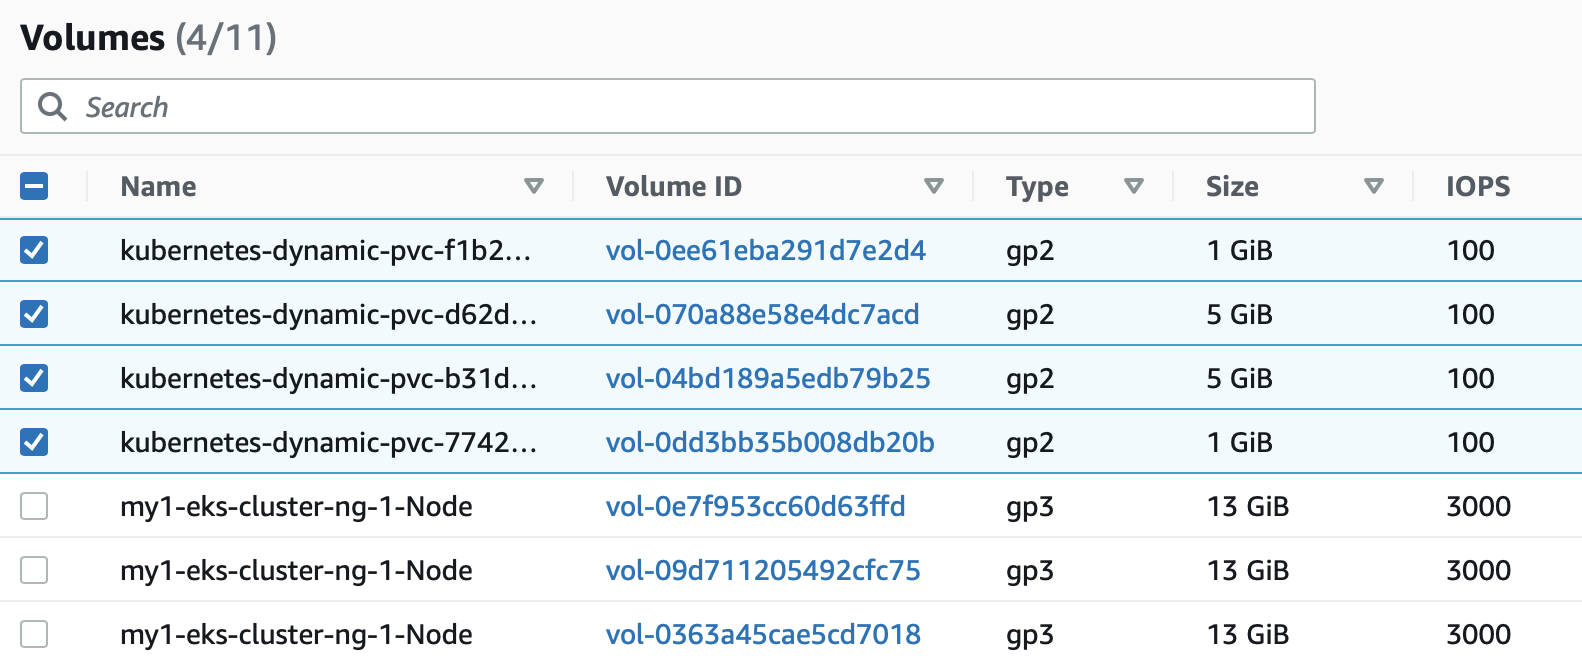
If we run the following command, we can see what persistent volume storage has been claimed.
kubectl get pv,pvc -n aerospike -o json | jq .'items[].spec.capacity.storage' | egrep -v -e null
"1Gi"
"5Gi"
"5Gi"
"1Gi"
Note we see the same persistent volumes when using the AWS Console as expected - included for completeness.

. . . .
Cleaning up
WARNING: If this step is bypassed and the EKS cluster is deleted, all persistent volumes created will remain.
Delete Aerospke Database Cluster
This is the important step and should always be run when using cloud storage classes.
kubectl delete -f ssd_storage_cluster_cr.yaml
aerospikecluster.asdb.aerospike.com "aerocluster" deleted
Check Persistent Volume Claims
If we now check our persistent volumes we see there are no persistent volumes remaining.
kubectl get pv,pvc -n aerospike -o json | jq .'items[].spec.capacity.storage' | egrep -v -e null
(nothing returned...) Similarly, if visiting the AWS Console, we can see only the volumes for the k8s nodes we initially created using the eksctl command.

Delete EKS Cluster
We can now go ahead and delete the EKS cluster
eksctl delete cluster -f my-cluster.yamlVerify Resources Deleted
Final check of our EBS volumes and we should find everything has been removed.

How not to clean up
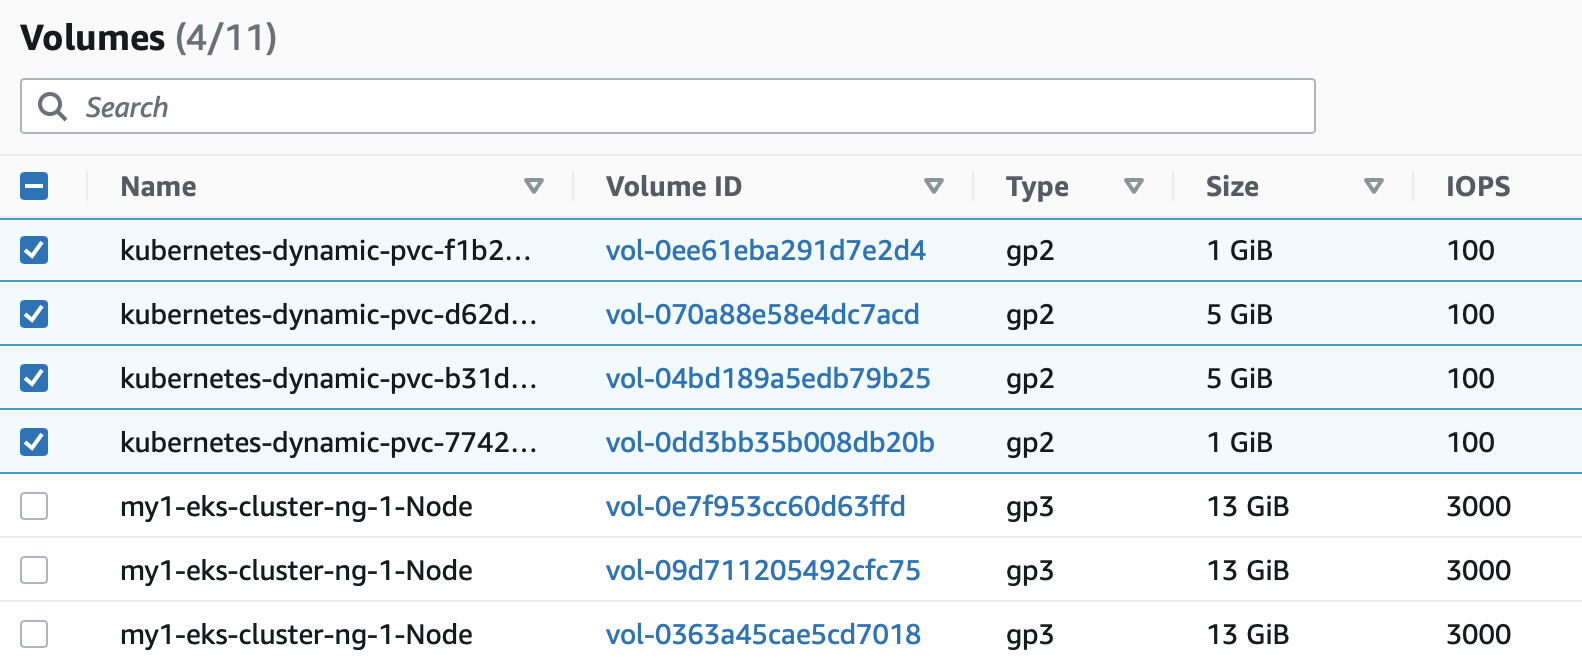
Assume we have a new EKS cluster, having installed the Aerospike Operator and a new Aerospike database. We then see the resources below.

Suppose we only we excecute the eksctl delete cluster command.
eksctl delete cluster -f my-cluster.yaml
In that case, the persistent volumes associated with Aerospike will NOT be deleted. In this example the volumes are small, but at $0.10/GB/month these costs can accumulate (100TB = $10k / month!). Numerous test iterations can result in capacity accumulating, generating large unwelcome AWS bills for. Note that we can go ahead and manually delete these volumes via the AWS Console - but only because we know they are there.
Conclusion
Automation tools are fantastic and this level of deployment agility is an astonishing convenience. It is always wise however to check on final results and not assume the tools take care of everything. Another moral is that following instructions in full may be the wise initial path - the author probably detailed those steps for good reason.
Keep reading

Feb 17, 2026
Giving database operators visibility and direct control with dynamic client configurations

Feb 9, 2026
Introducing Aerospike 8.1.1: Safer operations, more control, and better behavior under load

Feb 9, 2026
How to keep data masking from breaking in production

Feb 5, 2026
Helm charts: A comprehensive guide for Kubernetes application deployment


