Introducing the Aerospike Kubernetes Operator
Over the past decade we have seen dramatic changes in the types of traffic patterns that developers need to plan for. For example, one day you could be at a standard traffic load, and the next moment need to scale to handle tens-of-thousands of visitors. This can lead to all sorts of issues with cost, response time and scale.
There is no place where this is felt more than in your database. Most databases struggle to handle these issues. This is where Aerospike can help. Aerospike was designed as a highly scalable, NoSQL database for modern applications, and right now there is nothing more modern than running a stateful database with Kubernetes.
Recently the Kubernetes Community has improved enterprise-readiness with persistent volumes, operators and helping developers transition to the cloud, or manage their own hybrid environments. But if you are new to Kubernetes, setting up and managing more than a simple cluster can be rather daunting.
This is why Aerospike is announcing the release of the Aerospike Kubernetes Operator. The Aerospike Operator gives you the ability to deploy multi-node clusters, recover automatically from node failures, scale up or down automatically as load changes, ensure nodes are evenly split across racks or zones, automatically update to new versions of Aerospike and manage other configuration changes in your clusters.
Automation framework with the Kubernetes Operator
A Kubernetes Operator is a custom controller that extends the Kubernetes API to efficiently deploy and manage your Kubernetes clusters. It automates the management of common tasks such as the configuration, provisioning, scaling and recovery of an application, hereby reducing the complexity of managing a Kubernetes deployment.
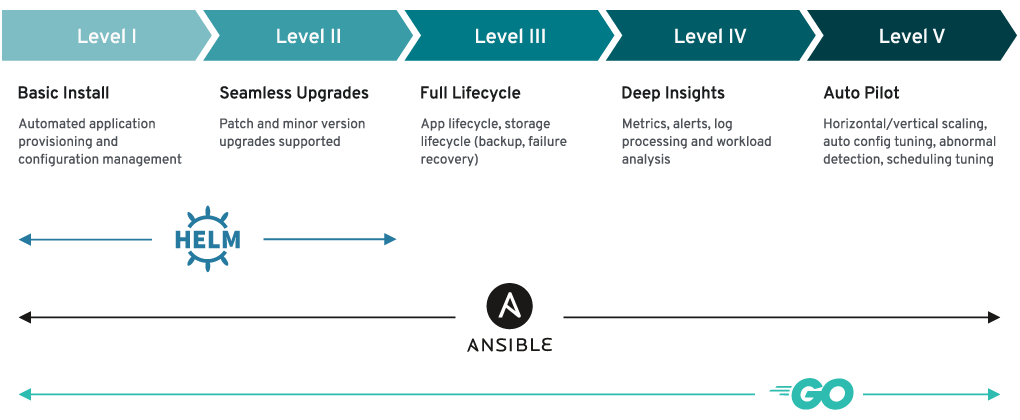
The Kubernetes Operator framework (below) is a way to think about the capabilities of an operator. This framework has five maturity levels to evaluate an operator such as installation, upgrades, management, monitoring, and full operational autonomy.

Aerospike Kubernetes Operator Capabilities
The Aerospike Kubernetes Operator uses the Operator Framework to efficiently deploy, manage and update their Aerospike clusters. It automates the provisioning and lifecycle management of common Aerospike database tasks, thereby reducing the complexity of manual deployment and management. The first release of the Operator supports the following capabilities:
Deploy new Aerospike clusters
Scale up and down existing Aerospike clusters
Version upgrade and/or downgrades
Configure persistent storage
Standardize configurations
Monitor cluster performance
High-level architecture
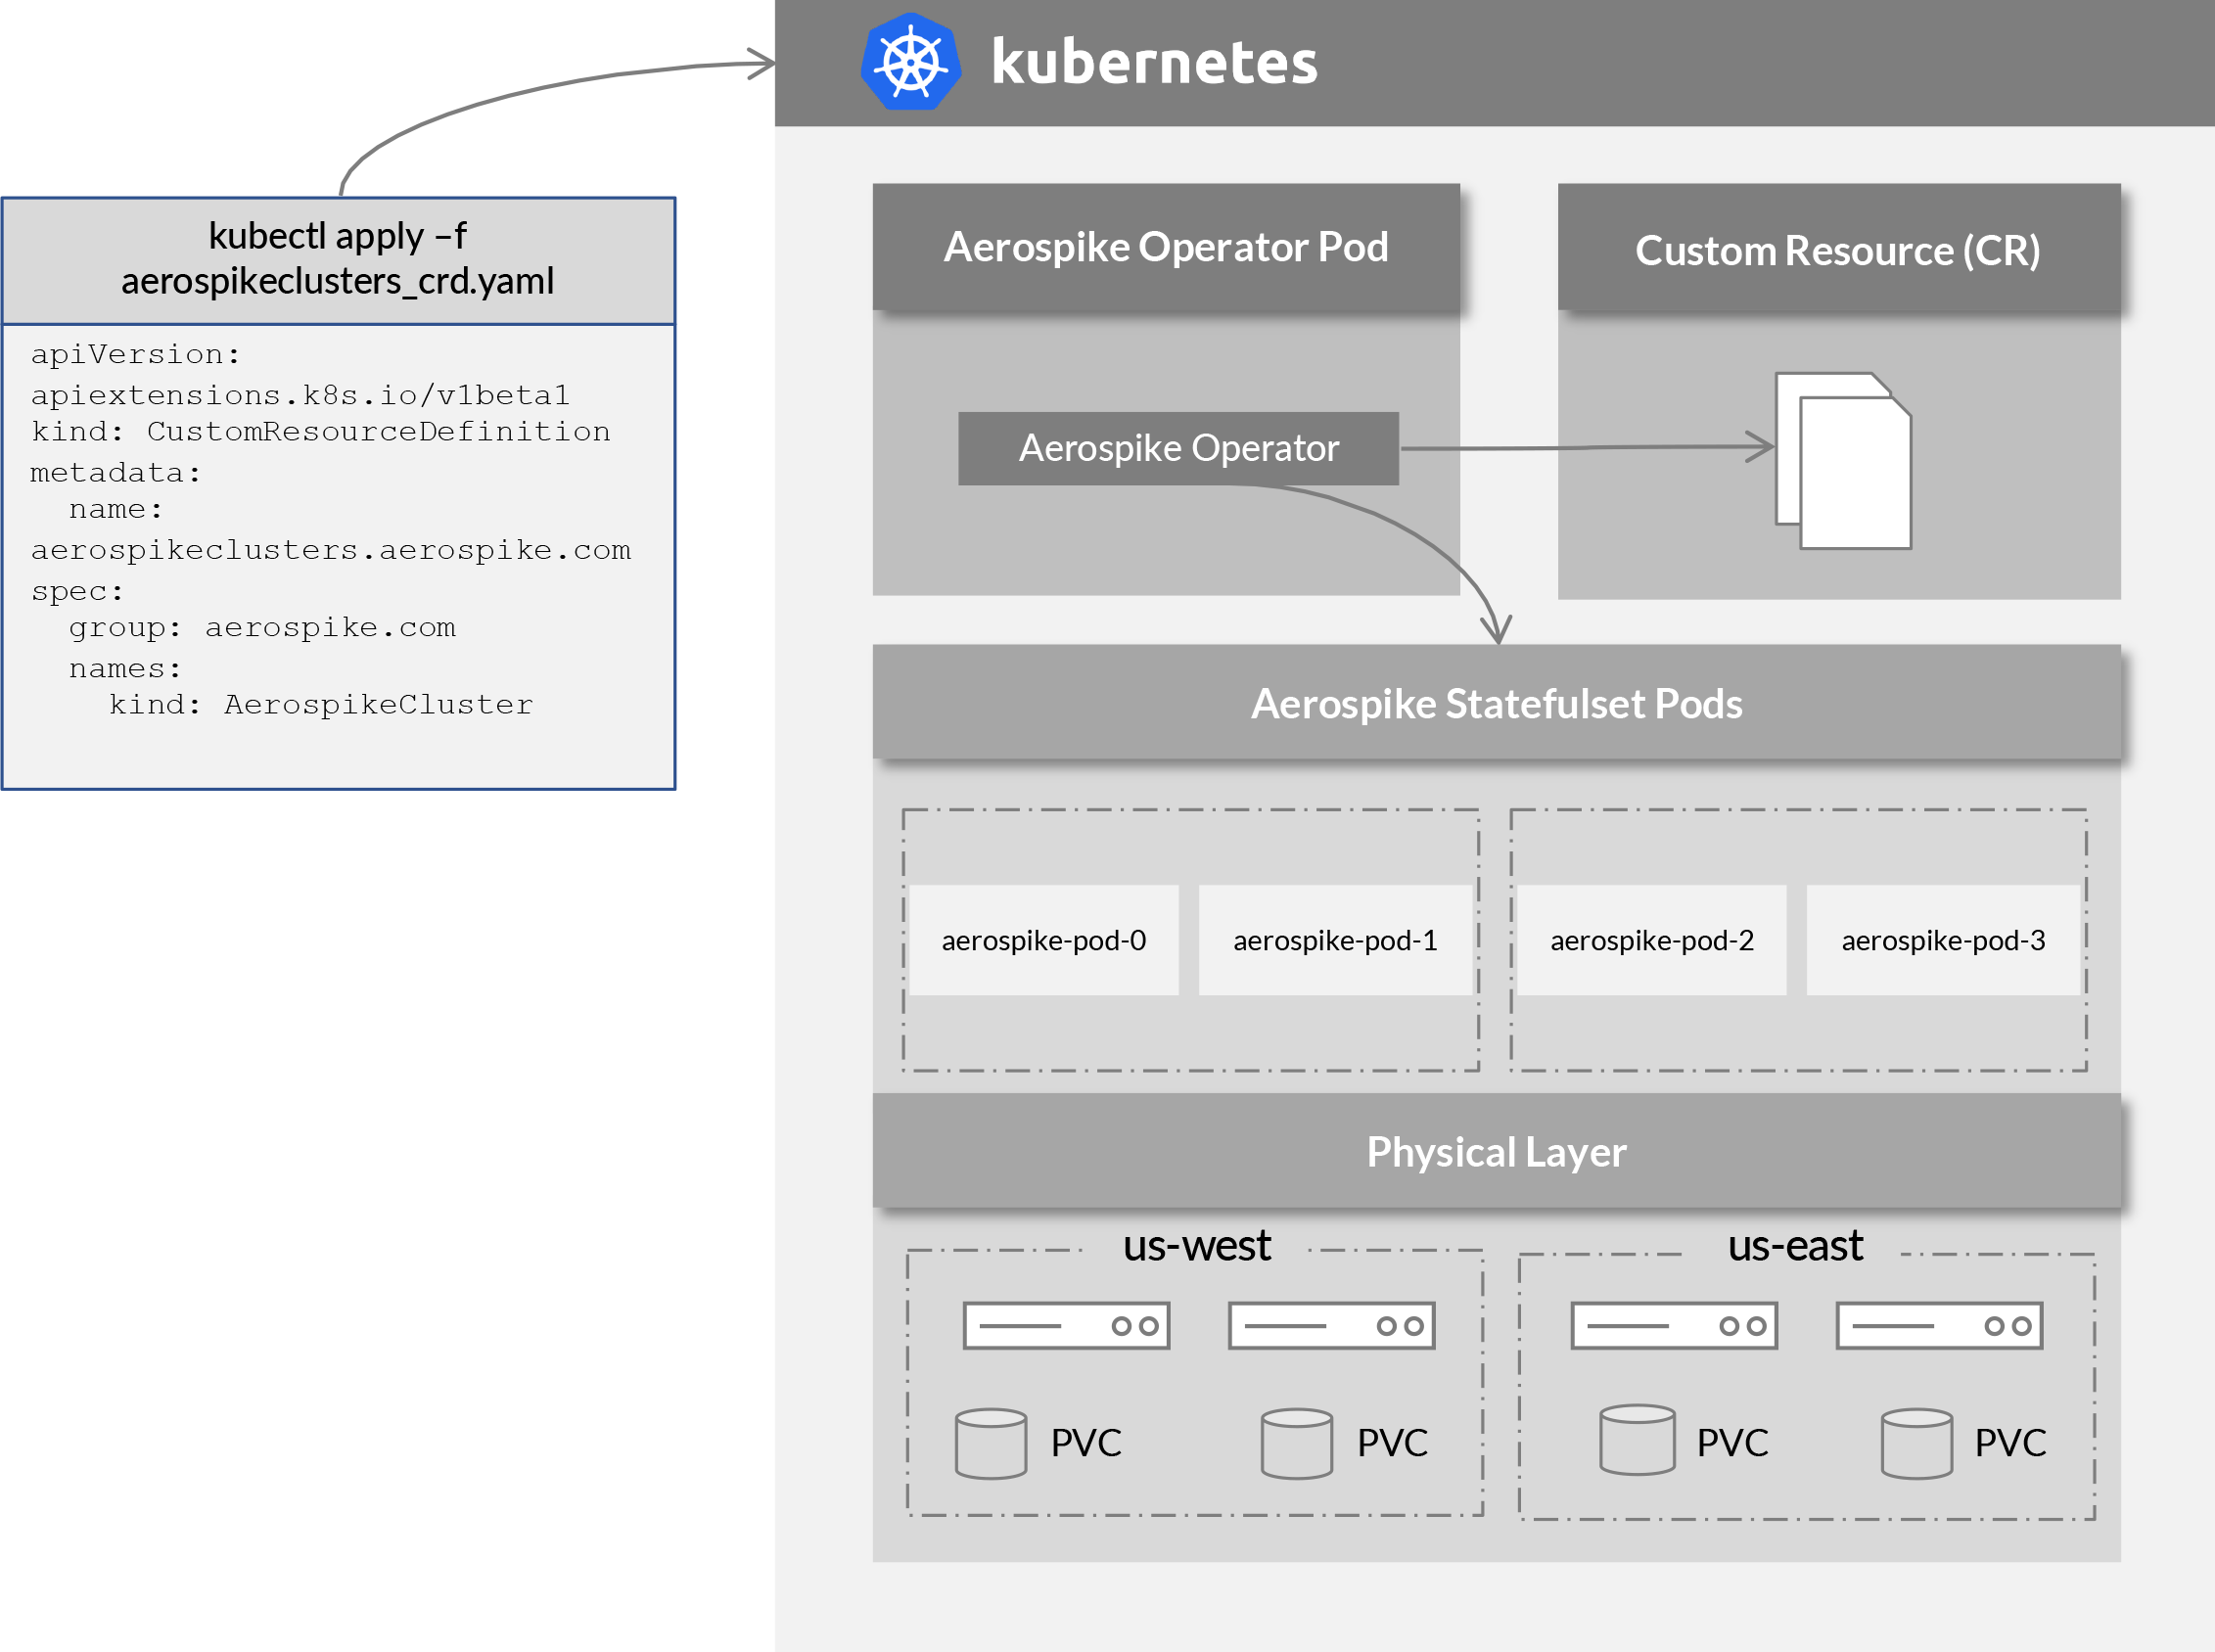
The Aerospike Kubernetes Operator provides a custom controller, written in go, that allows us to embed specific lifecycle management logic to effectively manage the state of an Aerospike cluster. It does so by managing a Custom Resource Definition (CRD) to extend the Kubernetes API for Aerospike clusters. Regular maintenance to the Aerospike cluster deployment and lifecycle management are performed by updating an Aerospike cluster Custom Resource (CR).
The Operator is deployed with StatefulSet and operates as a headless service to handle the DNS resolution of pods in the deployment. Kubernetes StatefulSets is the workload API object that is used to manage stateful applications. This is important because it manages the deployment and scaling of a set of Pods, and provides guarantees about the ordering and uniqueness of these Pods (e.g. as unique addressable identities).
A layered approach is taken to orchestration which allows the Operator to manage Aerospike Cluster tasks outside of the Aerospike deployment.
Aerospike Kubernetes Operator Architecture

Getting started with Aerospike Kubernetes Operator
This next section is a brief tutorial on getting started, but first you will want to be sure that you are knowledgeable about general Kubernetes concepts such as custom resources, role-based access, storage classes and operators. To create a kubernetes cluster, please refer to the documentation for your cloud platform.
Install the Operator on Kubernetes
Download Operator Package
Download the Aerospike Operator package and unpack it on the same computer where you normally run kubectl. The Operator package contains YAML configuration files and tools that you will use to install the Operator.
To clone the Aerospike Github Operator repository
$ git clone https://github.com/aerospike/aerospike-kubernetes-operator.git
$ git checkout 1.0.0
Create a New Namespace
Create a new Kubernetes namespace for Aerospike, so that you can put all resources related to your Aerospike cluster in a single logical space.
$ kubectl create namespace aerospikeInstall Aerospike CRD
Use the aerospike.com_aerospikeclusters_crd.yaml file to install the operator’s CRDs.
$ kubectl apply -f deploy/crds/aerospike.com_aerospikeclusters_crd.yamlSet up RBAC
$ kubectl apply -f rbac.yamlDeploy the Operator
Aerospike Kubernetes Operator can be deployed by applying the operator.yaml file. This file has a deployment object containing the operator specs.
This object can be modified to change specs, such as the number of Pods, log level for the operator, and imagePullPolicy. This will create a deployment having the specified number of Pods for the operator. To configure high availability of the Operator, spec.replicas can be set to more than 1. The Operator will automatically elect a leader among all replicas.
To Install the Operator
$ kubectl apply -f operator.yamlVerify the Operator is Installed
$ kubectl get pod -n aerospikeCheck the Operator Logs
To check the operator logs, copy the name of the pod.
$ kubectl -n aerospike logs -f aerospike-kubernetes-operator-d87b58cfd-zgqqlDeploy the Aerospike Cluster
Defining your Aerospike cluster involves creating a custom resource, a YAML file in which you specify configuration settings. To deploy an Aerospike cluster using the Operator, you will create the Aerospike configuration file that describes what you want the cluster to look like (e.g. number of nodes, types of services, system resources, etc), and then push that configuration file into Kubernetes.
Storage Classes
The Aerospike Operator is designed to work with dynamically provisioned storage classes. A storage class is used to dynamically provision the persistent storage and the Aerospike Server pods may have different storage volumes associated with each service.
To learn more about configuring persistent storage please refer to this documentation and the cloud platform samples below:
For Amazon Elastic Kubernetes Service, the instructions are here.
For Google Kubernetes Engine, the instructions are here.
For Microsoft Azure Kubernetes Service, the instructions are here.
Storage Class Configuration
The first step is to list any preexisting storage classes available on the platform. For example, Google GKE already has a storage provider configured.
$ kubectl get storageclass
NAME           PROVISIONER     RECLAIMPOLICY   VOLUMEBINDINGMODE
Standard kubernetes.io/gce-pd Delete Immediate
Apply the storage class:
$ kubectl apply -f gce-ssd-storage-class.yaml

storageclass.storage.k8s.io/ssd created
View the storage class configuration:
$ kubectl get storageclass

NAME           PROVISIONER     RECLAIMPOLICY   VOLUMEBINDINGMODE

ssd            kubernetes.io/gce-pd   Delete   WaitForFirstConsumer
Create Kubernetes Secrets
Kubernetes secrets are used to store information securely. You can create secrets to setup Aerospike authentication, TLS, and feature.conf. See TLS for more details.
To create a Kubernetes secret for connectivity to the Aerospike cluster, the Aerospike features.conf can be packaged in a single directory and converted to Kubernetes secrets with the following command:
$ kubectl -n aerospike create secret generic aerospike-secret --from-file=deploy/secretsTo create a secret containing the password for Aerospike cluster admin by passing the password from the command line.
$ kubectl -n aerospike create secret generic auth-secret --from-literal=password='admin123'Create a Custom Resource (CR)
The Aerospike Custom Resource (CR) contains the specifications for the cluster deployment. Refer to the Configuration section for details of the Aerospike cluster CR. The custom resource file can be edited later on to make any changes to the Aerospike cluster.
The Operator package contains sample Aerospike Custom Resource files here.
Deploy Aerospike Cluster
Deploy the Aerospike cluster by running this command to apply your custom resource to the Kubernetes cluster:
$ kubectl apply -f ssd_storage_cluster_cr.yaml
aerospikecluster.aerospike.com/aerocluster created
Verify the Cluster
Ensure that the aerospike-kubernetes-operator has created a StatefulSet for the CR.
$ kubectl get statefulset -n aerospike

NAME            READY   AGE

aerocluster-0   0/2     38s
Check the status of the pods that the Aerospike cluster is using:
$ kubectl get pods -n aerospike

NAME                READY   STATUS      RESTARTS   AGE

aerocluster-0-0     1/1     Running     0          48s

aerocluster-0-1     1/1     Running     0          48s
The output should show that the status of each pod is Running. This example shows the output of an Aerospike cluster with two pods. For each Aerospike cluster that you want to deploy into the same Kubernetes namespace, repeat the steps above.
Connect to the cluster
Obtain the Aerospike node endpoints by using the kubectl describe command to get the status of the cluster.
When connecting from outside the Kubernetes cluster network, you need to use the host external IPs. By default, the operator configures access endpoints to use Kubernetes host internal IPs and alternate access endpoints to use host external IPs.
Please refer to network policy configuration for details.
From the example status output, for pod aerocluster-0-0, the alternate access endpoint is 34.70.193.192:31312
To continue learning about the operator configuration, management, security and more, please checkout the Aerospike Kubernetes Operator Wiki.
Conclusion
In this post we discussed how the Aerospike Kubernetes Operator is an important tool to help you deploy and manage Aerospike Clusters with enterprise performance, scale, HA and application resiliency. We also briefly covered how to get started.
To learn more about the Operator checkout our GitHub Wiki documentation and sample files here.
Give it a try and let us know what you think!


